120 Retro Lights Photo Overlays: A Practical Evaluation for Designers and Photographers
If you're working with digital imagery and aiming for a distinct 1980s or early-1990s aesthetic—think neon-drenched cityscapes, analog TV scan lines, or VHS-style chromatic aberration—you may have encountered 120 Retro Lights Photo Overlays. This collection isn’t just another set of light leaks or lens flares. It’s a focused, high-resolution toolkit designed specifically to evoke retro-futurism, cyberpunk moods, and vintage screen-based textures without relying on complex layer blending or custom brushwork.
What Sets 120 Retro Lights Photo Overlays Apart
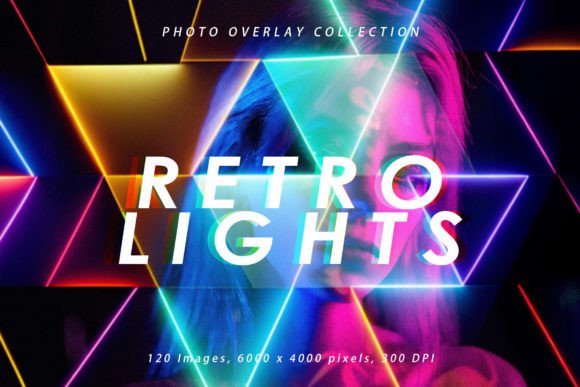
At its core, 120 Retro Lights Photo Overlays delivers 120 individual JPG files, each sized at 6000×4000 pixels and saved at 300 dpi. That resolution allows flexibility: you can scale down for web use without visible pixelation or retain full fidelity for large-format print applications like posters or exhibition banners. Unlike many overlay packs that include only soft glows or generic bokeh, this set emphasizes intentional, stylized lighting—think grid-aligned neon bars, pulsing CRT scan patterns, warped halos, and saturated color gradients that mimic cathode-ray tube distortion or early LED signage.
The inclusion of a help file adds practical value. It outlines basic blending modes (e.g., Screen, Lighten, Overlay), recommended opacity ranges, and tips for non-destructive editing in Photoshop or Affinity Photo. This is especially helpful for users who aren’t familiar with how transparency and luminance interact across different layer modes—and it signals that the creators prioritized usability over sheer volume.
How It Fits Within the Broader Landscape of Photo Textures
Retro lighting effects fall into several overlapping categories: light leak overlays, film grain textures, scan line assets, color grading LUTs, and procedural generative tools. 120 Retro Lights Photo Overlays sits squarely in the first category—but with notable specificity. Most light leak packs emphasize organic, unpredictable analog imperfections: streaks from damaged film canisters or accidental lens flare. In contrast, this set leans into designed imperfection—geometric, rhythmic, and often symmetrical. That makes it more suitable for intentional composition than serendipitous enhancement.
Compared to LUT-based approaches (which adjust color and contrast globally), these overlays offer localized control. You can apply a neon grid to a background while leaving skin tones untouched—or mask a flickering bar effect to appear only behind a subject’s silhouette. That level of precision isn’t possible with most color grading presets alone.
It also differs from procedural tools (like certain After Effects plugins or AI-powered texture generators) in that it’s static and predictable. There’s no rendering time, no dependency on GPU performance, and no learning curve tied to node-based workflows. What you see is what you get—immediately usable in any photo editor that supports JPG layers.
Real-World Use Cases and Practical Tradeoffs
120 Retro Lights Photo Overlays excels in scenarios where consistency, speed, and stylistic cohesion matter. For example:
- A graphic designer building a series of event flyers for a synthwave music festival might use the same grid overlay across all pieces—ensuring visual continuity without manually recreating the effect each time.
- A photographer editing portraits for a client’s personal branding project could subtly layer a soft cyan-and-magenta halo behind the subject, reinforcing a futuristic but approachable tone.
- A marketer preparing social media banners for a tech startup launching a retro-themed product line might combine multiple overlays—say, a low-opacity scan line texture beneath a brighter neon arc—to build depth without overwhelming the message.
However, limitations exist. Because all files are JPGs—not layered PSDs or transparent PNGs—there’s no built-in alpha channel. That means masking requires manual work in your editor if you want precise edge control. Also, while the 6000×4000 resolution accommodates most needs, extremely wide panoramic images (e.g., 12,000×3,000) may require tiling or scaling adjustments to avoid repetition.
Another consideration: color fidelity. Since JPG compression is lossy, subtle gradients—especially in deep blacks or near-white highlights—may show banding when stretched or heavily adjusted. Users working in strict CMYK print workflows should test output carefully, particularly for dark backgrounds where compression artifacts become more visible.
When It’s the Right Choice—and When It Might Not Be
120 Retro Lights Photo Overlays is strongest when you need immediate, repeatable, high-resolution retro lighting that integrates cleanly into existing workflows. It’s ideal for designers who already use Photoshop or Affinity and prefer drag-and-drop efficiency over plugin installation or subscription-based services. It also suits photographers who edit batches of images and want consistent stylization without scripting or batch-processing complexity.
It’s less suited for projects requiring dynamic interaction—such as animated overlays for video or responsive web elements that adapt to screen size. Nor does it replace foundational skills like color theory or composition; applying a neon grid won’t fix poor lighting or cluttered framing. The overlays enhance intention—they don’t substitute for it.
If your work involves frequent motion graphics, consider pairing this set with complementary resources: a small library of loopable VHS noise clips for video, or a handful of high-quality PNG-based glitch elements for sharper vector-compatible edges. Likewise, if you regularly shift between analog film emulation and digital futurism, you’ll likely benefit from combining 120 Retro Lights Photo Overlays with a curated film grain pack or a set of subtle halftone textures.
Integration Tips for Better Results
Getting the most out of 120 Retro Lights Photo Overlays depends less on quantity and more on thoughtful application. Here are three evidence-based practices:
- Start with blending mode and opacity: Begin at 15–30% opacity using the Screen or Lighten mode. Adjust upward only where needed—overuse flattens contrast and obscures detail.
- Mask selectively: Use layer masks to restrict overlays to backgrounds or negative space. A vibrant pink arc works well behind a subject but can distract if it crosses facial features or text.
- Combine thoughtfully: Try stacking two overlays—one subtle (e.g., faint horizontal scan lines) beneath a bolder one (e.g., diagonal neon beams). This builds dimension without visual noise.
Also worth noting: because all files are JPGs, they’re universally compatible—not just with Adobe and Affinity apps, but also with open-source tools like GIMP and even some browser-based editors like Photopea. That cross-platform accessibility broadens its utility beyond professional studios into education, hobbyist projects, and collaborative environments where software licenses vary.
Final Considerations Before You Choose
While 120 Retro Lights Photo Overlays offers strong value for its niche, evaluate it alongside your actual workflow—not just its headline specs. Ask yourself:
- Do I primarily edit still images—or do I need motion, interactivity, or real-time preview?
- Am I comfortable adjusting masks and blending modes manually—or do I rely heavily on automated presets?
- Is stylistic consistency across multiple deliverables a priority—or am I exploring varied, one-off moods?
If the answers point toward controlled, repeatable, high-res still-image enhancement with minimal setup, then 120 Retro Lights Photo Overlays is a well-considered resource. If your needs trend toward adaptability across formats, automation, or fine-grained parametric control, you may want to explore hybrid solutions—combining this set with other tools rather than relying on it exclusively.